A paper fortune teller, often known as a cootie catcher, is a nostalgic childhood craft that’s fun and easy to make. This guide will walk you through the simple steps to create your own fortune teller, perfect for entertaining friends and family.
1. Gather Your Materials
To embark on the delightful journey of creating a paper fortune teller, the first step is to gather all the necessary materials. This initial phase is crucial because having everything you need on hand streamlines the process, making it smoother and more enjoyable. Here’s a comprehensive list of the items you’ll require:
Paper:
The cornerstone of your craft, a square piece of paper, is essential. While any paper will do, using colorful or patterned paper can add an extra layer of fun and personality to your fortune teller. If you only have standard A4 or letter-sized paper, don’t worry. We’ll guide you through the simple steps to transform it into a perfect square.

Markers, Pens, or Crayons:
Once your fortune teller is folded, you’ll want to add colors, numbers, and fortunes. Markers, pens, and crayons allow you to personalize your creation with vibrant designs and handwritten messages. This is where you can let your creativity shine, so feel free to use a mix of colors and styles.
Scissors:
If you’re starting with a rectangular piece of paper, scissors will be necessary to cut it into a square. They can also come in handy if you decide to add decorative elements to your fortune teller, such as fringes or cutouts.
Imagination and Creativity:
Perhaps the most important materials you’ll need are your imagination and creativity. Your fortune teller can be as simple or as intricate as you like. Think about the types of fortunes you want to include. Will they be funny, encouraging, or whimsical? The design and messages are entirely up to you, so have fun with it.
After gathering your materials, you’ll find that the process of making a paper fortune teller is not only about the end product but also about the joy of creating something unique with your own hands. Whether you’re making it for yourself, a family member, or a friend, the personal touches you add will make it special.
With your materials ready, the next step is to dive into the folding process. This is where your paper starts to transform into a fortune teller, ready to predict fun and exciting futures. Remember, the goal is not perfection but rather to enjoy the process and let your creative spirit flow.
So, grab your paper, scissors, and coloring tools, and let’s move on to the next step: folding your fortune teller. This part of the journey is not only about crafting something tangible but also about unlocking your creative potential and enjoying a moment of playful nostalgia.
2. Folding Your Fortune Teller
The magic of creating a paper fortune teller lies in the folding process. It’s a simple yet captivating procedure that transforms a flat piece of paper into an interactive game of fate and fun. Here, we’ll guide you through the step-by-step process to ensure your fortune teller comes to life with just a few folds. This section is not just about the mechanics of folding but also about infusing your creation with personality and charm.
Step 1: Creating a Square
Begin with a rectangular piece of paper. If it’s not already square, fold one corner to the opposite edge to form a triangle. This will leave you with an excess strip of paper, which can be cut off to result in a perfect square. Unfold the triangle, and you’re ready to proceed.
Step 2: The First Folds
Lay the square flat, colored or patterned side down if applicable. Fold the paper in half horizontally, then unfold and repeat vertically. These initial folds create creases that will guide the remaining steps. Make sure each fold is sharp and precise for the best outcome.
Step 3: Corner Folds
Next, fold each corner of the square into the center, aligning it with the point where your first folds intersect. You’ll end up with a smaller square, each side being a folded corner of the original piece. This step is crucial as it starts to give your fortune teller its characteristic shape.
Step 4: The Second Set of Corner Folds
Flip your paper over. Again, fold each corner into the center. This action further compacts the paper, creating a smaller square. The precision in your folds will significantly affect the final appearance and functionality of your fortune teller, so take your time to align the edges neatly.
Step 5: Final Folds and Finishing Touches
Finally, fold the square in half, creasing well. Then, insert your fingers into the pockets formed by the folded paper. Gently push the corners together, causing the center to pop out and form the fortune teller’s familiar shape. Congratulations, you’ve now completed the main structure of your paper fortune teller!

This process, though straightforward, allows for a lot of creativity. The colors, patterns, and even the texture of the paper can make each fortune teller unique. Remember, the most important aspect of this craft is not achieving perfection but enjoying the journey of creation. As you become more comfortable with these steps, feel free to experiment and customize your fortune tellers to match your personality or that of your friends and family.
The next phase of creating your paper fortune teller involves adding colors, numbers, and fortunes. This is where your creativity really shines, turning a simple piece of folded paper into a personalized predictor of the future, a source of laughter, and a tool for decision-making. So grab your markers, pens, or crayons, and let’s move on to the next exciting step.
3. Adding Colors, Numbers, and Fortunes
The final stage of creating your paper fortune teller is where your creativity truly gets to shine. This phase involves personalizing your craft with colors, numbers, and whimsical fortunes. It’s not just about decorating; it’s about infusing your fortune teller with a bit of magic and personality. Let’s dive into how you can accomplish this.
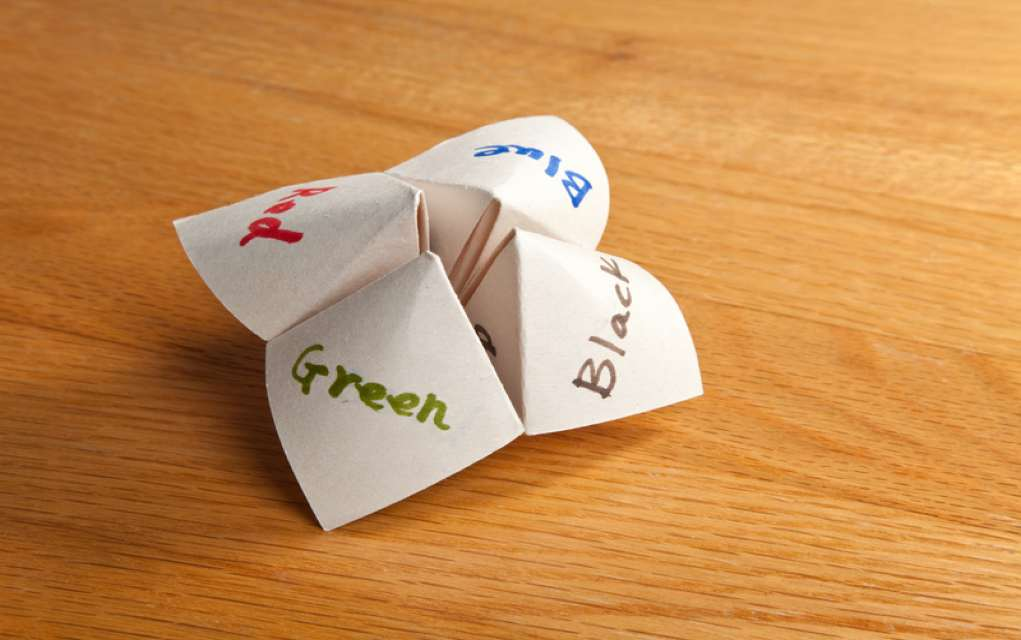
Choosing Your Colors
The first step is to decide on the colors you want to use. You can either go for a theme, such as pastels for a soft look or bright neon for something more vibrant. The colors will be used on the outer and inner flaps and can represent different emotions or choices. For example, you might associate red with love and blue with adventure. Grab your markers, pens, or crayons, and start coloring each of the outer flaps in your chosen hues. Remember, the goal is to make it visually appealing and fun to play with.
Adding Numbers
Once you have your colors down, it’s time to add numbers. On the inside flaps, where you’ve just added color, you’ll now need to choose eight numbers. These can be any numbers you like, but they’re typically from 1 to 8. The numbers add an element of chance to the game, determining how many times the player will move the fortune teller to reveal their fortune. Write the numbers on the inside flaps, making sure they’re clearly visible.
Writing the Fortunes
The most exciting part of creating a paper fortune teller is writing the fortunes. This is your chance to be creative, whimsical, or even a bit silly. Lift each flap and write a short message or fortune underneath. These can range from predictions, like “You will travel to a faraway land,” to advice, like “Believe in yourself.” You can tailor the fortunes to the person you’re making it for or keep them general for anyone to enjoy. The key is to have fun with it and think about what might bring a smile to someone’s face.
Creating a paper fortune teller is not just about folding paper. It’s about bringing joy, sparking imagination, and perhaps even providing a moment of reflection with its whimsical fortunes. Whether you’re making it for yourself, a friend, or a family member, the personal touches you add make it a special keepsake. So, let your creativity run wild, and remember, the most beautiful part of this craft is the joy and laughter it brings.
With your colors chosen, numbers added, and fortunes written, your paper fortune teller is now ready to play with. It’s not just a piece of paper but a vessel of imagination and fun, ready to predict the future in the most entertaining way possible. Enjoy the smiles and surprises it brings, and don’t forget to make a wish before you peek at your fortune. Who knows? It might just come true.
Please register as a member at here to comment & contribute content.